In this post, we’ll delve into measuring CO₂ levels. We’ll use the MH-Z19B sensor, connected to a Raspberry Pi, and read out its measurements using Python.
Background: measuring CO₂ levels in house
First off, some background information on indoor CO₂ levels. (Note: this is about CO₂ = carbon dioxide, not CO = carbon monoxide.1)
CO₂ levels are measured in ppm or “parts per million”: out of a million molecules in the air, how many are CO₂ molecules? Currently, CO₂ levels in the atmosphere are about 420 ppm, with slight seasonal variations. An interesting side note is that, before the Industrial Revolution, atmospheric CO₂ levels were around 280 ppm, but we’re not here to talk about climate change.
Indoors, CO₂ levels can vary from 420 ppm (the atmospheric level is the minimum you can reach, when you have your windows open), to 1500–2000 ppm in closed rooms, and even higher in crowded rooms such as class rooms or meeting rooms. The largest contributor to this is the CO₂ humans and large pets exhale. (A large dog exhales about half the CO₂ a human exhales.)
Elevated CO₂ levels can lead to several health problems, such as headaches and drowsiness. Recommendations vary, with the United States goverment currently limiting exposure to 5000 ppm for an eight-hour period, but other studies showing possible negative effects starting at 1000 ppm. (A level of 40,000 ppm is considered “immediately dangerous to life and health”, but you’re unlikely to encounter that.) If two people sleep a whole night in a closed bedroom, it’s possible to get to levels of 2000 ppm. Especially in modern, well-insulated homes and in schools and offices where many people gather, it is therefore important to have sufficient ventilation to keep CO₂ levels below these limits.
I got interested in measuring CO₂ at home to better configure my ventilation unit. This machine sucks in fresh air from outside and blows “used” air out (and at the same time has a heat exchanger that warms the incoming air using the outgoing air). Its air flow rate can be configured from 0 to 100%. Higher rates use more electricity and therefore cost more, but of course its rate should be high enough to keep CO₂ levels below safe limits.
Why the MH-Z19B sensor?
You can find many CO₂ sensors online. There are roughly two kinds: those that measure VOC and those that actually detect CO₂ molecules. The first kind detect Volatile Organic Compounds (VOCs): organic compounds that we exhale together with CO₂ and can therefore be used as a proxy to estimate the CO₂ in the air. However, results of such sensors often have quite large errors, as shown for instance in this video: a tumble dryer produces dust that contains VOCs, but does not produce CO₂. A VOC sensor will therefore incorrectly report high CO₂ levels when a tumble dryer is on. The usually cited advantage of VOC sensors is that they’re cheaper. The second kind of sensors measure CO₂ directly, but are often said to be more expensive. However, the MH-Z19B sensor is a cheap sensor of the second kind, so that’s why I chose to use that one.
The MH-Z19B sensor measures CO₂ using the non-dispersive infrared (NDIR) principle. It has an infrared lamp, of which the light is directed through two chambers. The first chamber is open to the air we want to measure; the second contains a reference gas, typically nitrogen. At the end is a detector. The gases in each chamber absorb certain wavelengths, and by comparing the results of the two chambers for the wavelengths absorbed by CO₂, we can calculate the CO₂ concentration in the air.
The MH-Z19B sensor has a reported accuracy of about 100ppm and a measuring range from 0 to 5000ppm. Its results should also be independent from the humidity. You can find the MH-Z19B sensor on AliExpress or European electronics websites (didn’t check others) for about $15 or €15.
Connecting the MH-Z19B sensor to a Raspberry Pi
It is easy to connect the MH-Z19B sensor to a Raspberry Pi, as shown below. (Figure from here.)
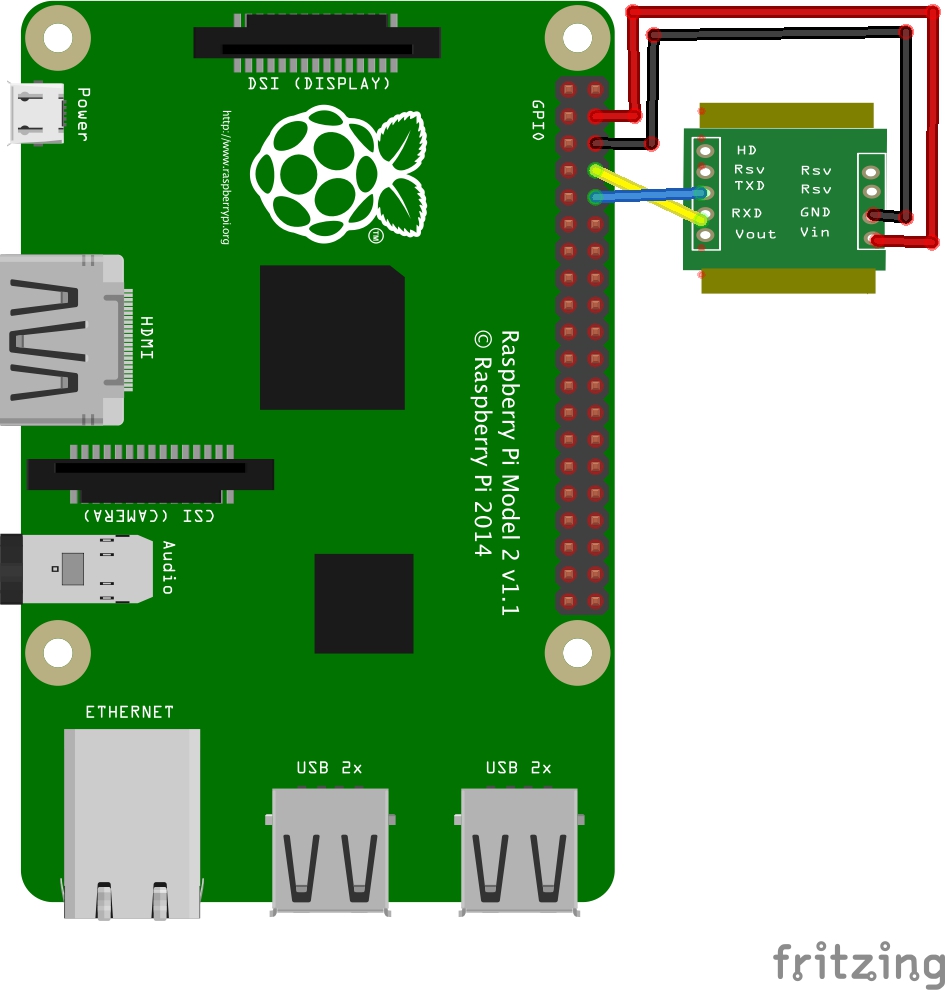
This table shows which pins to connect: (for Pi models with 40 pins, that is all models since 1B+ up to at least 4B, check here)
| MH-Z19B | Raspberry Pi GPIO | Function |
|---|---|---|
| 6 Vin | 4 (or 2) +5V | 5V current |
| 7 GND | 6 (or another ground pin) GND | Ground |
| 2 Rx | 8 Tx (UART) | Commands from Pi to sensor |
| 3 Tx | 10 Rx (UART) | Data from sensor to Pi |
I found two versions of the MH-Z19B sensor online: one with just “holes” at the end and one with pins soldiered on already. I bought the ones with pins, so that I could use female-to-female jump wires to connect the sensor with the Pi.
Configuring UART on Pi
The Raspberry Pi communicates with the sensor over its UART (universal asynchronous receiver-transmitter) interface: a device for asynchronous serial communication. You need to enable this by following some tricky steps, as in this guide or in the Raspberry Pi documentation. I’ve copied the instructions for the Pi 3 below, assuming you’re using Raspbian.
Disable Linux serial console
By default the serial port is assigned to the Linux console, allowing you to execute commands in a console over the serial port (using a service called getty). We want to disable as we want to use this port for the MH-Z19B sensor instead, do this as follows:
- Start raspi-config on the command line:
sudo raspi-config - Select “5 Interfacing Options”.
- Select “P6 Serial”.
- For the question “Would you like a login shell to be accessible over serial?” choose No.
- For the question “Would you like the serial port hardware to be enabled?” choose Yes.
Raspbian also comes with a GUI to configure these options.
Furthermore, execute the command sudo systemctl disable [email protected] to disable the getty service from starting on boot.
Enable UART in /boot/config.txt
At the bottom of /boot/config.txt, add the following line:
enable_uart=1
Reboot the Pi after these changes. The serial port is now available at /dev/serial0 (RPi 3 as well as older versions).
Reading CO₂ levels using Python
Now that we’ve connected the sensor to the Pi, we can start reading its measurements. You can find the full code on my GitHub. It’s a refactored and simplified of an existing library for my use case. I’m using Python 3.
Reading measurements
We are using the pyserial library to connect to the device. Its path is /dev/serial0. The following code will read the current measurements:
import serial

DEVICE_PATH = "/dev/serial0"
TIMEZONE = pytz.timezone("Europe/Brussels")

def current_time():
    now = datetime.datetime.now().astimezone(TIMEZONE)
    return now.strftime("%Y-%m-%dT%H:%M:%S%z")

def connect():
    return serial.Serial(DEVICE_PATH, baudrate=9600, timeout=3.0)

def read_all():
    with connect() as ser:
        ser.write(b"\xff\x01\x86\x00\x00\x00\x00\x00\x79")
        r = ser.read(9)

        if len(r) == 9 and r[0] == 0xff and r[1] == 0x86:
            return {"time": current_time(),
                    "co2": r[2]*256 + r[3],
                    "temperature": r[4] - 40,
                    "TT": r[4], # raw temperature
                    "SS": r[5], # status?
                    "Uh": r[6], # ticks in calibration cycle?
                    "Ul": r[7]} # number of performed calibrations?
        else:
            raise Exception("got unexpected answer %s" % r)
Here, the connect function connects to the device, returning an interface to the device. We then write nine bytes to the device: FF 01 86 00 00 00 00 00 79, which is the command to read the CO₂ concentration you’ll find in the MH-Z19B documentation. It’ll return nine bytes, which we’ll number 0 up to 8. What bytes 4 to 7 represent is not mentioned in the documentation, but people have tried to figure this out.
- Bytes 0 and 1 are
FF 86, which we check in theifcondition to make sure we got the expected reply. - The CO₂ concentration is byte 2*256 + byte 3. For instance, if
02 20(in hexadecimal) is returned, this corresponds to 2 and 32 in decimal numbers, and so the concentration is 2*256 + 32 = 544 ppm. - Byte 4 is probably the temperature in Celsius + 40. In my experience, this is often a few degrees above the actual room temperature.
- Byte 5 represents a status, and is always 0 in my case.
- Byte 6 counts ticks up to a new calibration. This counts from 0 to 142, incrementing every 10 minutes. Therefore, after 1440 minutes = 24 hours, it resets. Calibration of the sensor happens every 24 hours, at the moment this counter resests.
- Byte 7 counts the number of calibrations that have occurred, up to a maximum of 6.
The function read_all() therefore returns, for example:
{"time": "2020-08-23T15:36:24+0200", "co2": 448, "temperature": 29, "TT": 69, "SS": 0, "Uh": 7, "Ul": 6}
There’s an easy and fun way to test whether the sensor works: pour out a can of Coca Cola, beer, or other carbonated beverage, and hold the sensor above the glass. It should immediately measure CO₂ levels of several 1000s ppm.
Calibration
The sensor must be calibrated. It’ll consider the “ambient environment” level to be 400 ppm, and calculates its levels relative to that. There are three ways to calibrate the sensor (see sensor documentation):
- By connecting two pins when the ambient CO₂ level is 400 ppm.
- By sending the command
FF 01 87 00 00 00 00 00 78when the ambient CO₂ level is 400 ppm. - “Self-calibration”: every 24 hours, the sensor will calibrate by considering the lowest measured level to be 400 ppm. You can enable this with the command
FF 01 79 A0 00 00 00 00 E6, although it should be enabled by default.
I use the self-calibration because it is the easiest, as it does not require you to figure out when your sensor is in an environment with a CO₂ level of 400 or 440ppm. Note though that on its first use, you may have to have the sensor powered on for at least 24 hours before it’ll give accurate results. Using my script, you can enable automatic baseline calibration with python3 mh-z19.py --abc_on.
More
You can find the full script shown in this post in this GitHub project. Run sudo python3 mh-z19.py to output the time and CO₂ level to the terminal. Run sudo python3 mh-z19.py --all to also output the undocumented parameters. You need to run the script as root using sudo to be able to use the serial connection.
There’s one more feature I haven’t mentioned: you can set the sensor’s detection range to vary from 0 to 2000, 5000, or 10000 ppm. According to the documentation, this setting should not influence the sensor’s accuracy.
Automatically running this script and writing results to file
When my Python script runs without any parameters, it performs the measurement and writes its output as JSON to the terminal. As a final step, let’s run this script continuously and write its results to a file. I created a shell script mh-z19.sh, containing:
while true; do sudo python3 mh-z19.py --all | tee -a mh-z19.log; sleep 2m; done
This’ll run the script, and use tee to print its result to both the terminal and a log file. Every 2 minutes, a new measurement is added.
We’ve now succeeded in measuring the CO₂ in house and writing the results to a file. You can use this data to plot and examine the CO₂ levels over time, for instance using Matplotlib or Excel. You can also import the data into Home Assistant using the file integration, but that’s for another time.
-
CO₂ = carbon dioxide is not the same as CO = carbon monoxide. CO₂ is produced when humans exhale or during combustion, and although dangerous in high concentrations, normally you’ll notice and open a window before any permanent harm occurs. CO is produced from incomplete combustion and can lead to headache, dizziness, unconciousness, and death. However, these effects often occur without our body noticing, so CO is much more dangerous than CO₂. ↩